
Buy Low Price From Here Now
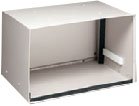
The Frigidaire EA108T Through-the-Wall 18 Inch Sleeve Kit is designed for the installation of Frigidaire through-the-wall equipment. This kit is necessary if there is no existing sleeve. It provides a weather-tight seal with or without the unit installed. It also includes an outside panel, sleeve, inside panel, construction support, weather seals, and mounting hardware. The recommended wall opening when mounting brackets are used is 26"W x 15.75"H.
Readmore
Technical Details
- Through-the-wall sleeve fits Frigidaire FAH series- Includes adjustable mounting brackets
- Includes locking clip
- Includes Sleeve-to-Unit seal
- For use with finished walls up to 17.75 inches thick
See more technical details

By James W. Lloyd (Dallas, TX)
I bought this product from Abt after they told me on the phone it was required for a Frigidaire FASxxxxxx installation. They were wrong. The FAS family of A/C's are 18" high, this box is approx 14" high. The FAS family can be installed through a wall without a sleeve, the A/C metal outside is a sleeve in itself. The sleeve sold here is for a masonry wall.
I was replacing an existing through the wall unit with another. The new unit was all I needed. This sleeve was a waste as well as the $23 I spent to return it.
Abt gave me bad advice. I'll not use them again
By Timothy C. Bartlett (TickFaw, LA ,USA)
Be forewarned!!!. Cutting into your wall is not a simple task.
This is NOT a window box it IS a kit to install a window unit through a wall you Will need to create a hole in the wall to put this through.
I've installed kits like this a few times it's a wonderful idea for a pertinent installation of what is normally considered a tacky yet important appliance.
Things you should know before starting this project.
Location of studs. (you will need to put this box in between studs never cut through a stud to install this device. If the stud spacing is to small consult a professional before you attempt an install. or risk you whole wall collapsing with half your roof.) if you must cut through a support you will need a double header and footer around the box.
Location of outlets and wires inside the wall
(You don't want to cut through any wire/pipe in your wall so don't put this OVER a plug as most plugs are dropped in from the attic or above(even if you live in a trailer.)
Ok dangerous part over with. :)
These last few items and hints are just for looks.
1. Get some molding to go around the exposed edge.
2. Have some foam or flashing to put on the outside of the box or risk water inside the wall in storms (basic stuff)
3. Have all the tools you'll need BEFOR you punch that hole in the wall.
4. Have a friend on standby just in case.
Not all kits will have molding or (make pretty) bits a bobs so expect to go to a home supply outlet of some-sort
Installing these isnt all that hard a proficient carpinder can do it in under an hour. But expect to spend most of the day on it. think weekend project take it slow.
Oh ya almost forgot.
run the AC on a flat surface for a while BEFORE you start in on the box and figure out how much of an angle you will need to insure the blasted thing drains OUTSIDE! and i mean let it run for a while it takes upwerds of 5 hrs to get a liquid buildup enough to drip.
Depending on the kit itself and your local humidity you may need to drill in a drain hole near the back of the kit (NOT THE AC) the kit! don't go drilling into your AC
Tools i used.
Tape Measure
Level
Drill
Hammer
nails/screws
Screwdriver bit for drill.
Saws-all
Flashlight
dust mask (drywall dust and junk)
screw driver (for where the drill wont catch)
old sheet/tarp
drill bits. one big one for starting the saws-all
(double header)
one to two 2x4's
Ripsaw (hand saw circular saw .. something to cut the 2x4)
LONG nails and or wood screws (DO NOT USE DRYWALL SCREWS)
Spare Drywall the hole inside will probably be larger than the required size for the box if you have to make a header. (drywall make pretty junk)
To make your life a little more easy use some header hangers (steel strips to hold up the header instead of just nails.
to create the header.
open the wall back untill you can see 3 studs
Cut the center stud out to the apropret gap.
Cut the 2x4's to the length to span the gap between the 2 outer studs you will need 4 of these.
Check your fit
Screw the 2x4's together lengthways to make them 4x4's
Use the hangers or nail in these new headers to the other studs and secure the center stud to the header. the connection point to the outer studs is the important part.
Pick where you want your box cut the outer hole and install.
Patch Drywall make it nice and install molding around the box slide the AC plug it in and enjoy the cold air. :)
Images Product
Buy Frigidaire EA108T Through-the-Wall 18 Inch Sleeve Kit Now
Tidak ada komentar:
Posting Komentar